Beginning your journey into henna art is exciting, especially when you are eager to create beautiful patterns on your hands, arms, or clients. Many beginners think they need expensive tools or advanced artistic skills to get started, but the truth is much simpler. Henna is an art that welcomes anyone willing to learn, practice, and explore. With the right supplies and a little guidance, even a complete beginner can progress quickly. Some learners choose to follow structured guidance through a Henna Course Online, while others experiment on their own. No matter your learning path, having the correct tools is essential for producing clean lines, smooth cones, and long-lasting stains. Let’s explore the must-have supplies every beginner should collect before starting their henna journey.
Choosing the Right Henna Powder
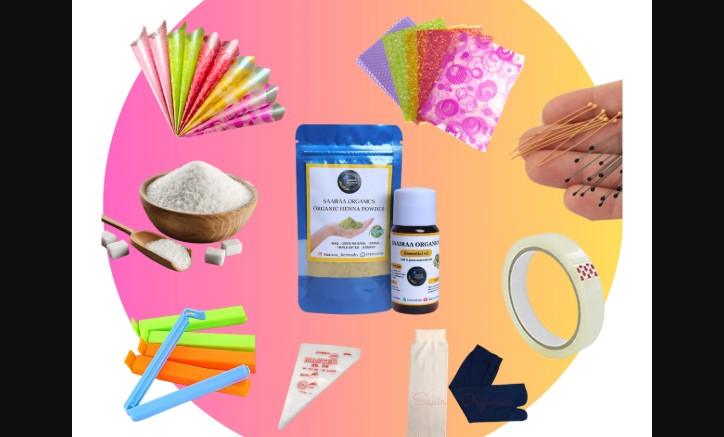
Henna powder is the foundation of all designs, so selecting the right one is your first important step. Not all henna powders are equal, and beginners often struggle with poor consistency or weak stains simply because they bought low-quality powder. Good henna powder should be finely sifted, naturally greenish, and free from chemicals or dyes. Organic henna is the safest and most reliable choice for beginners. You should always look for fresh powder, ideally from reputable suppliers who specialize in henna. Fresh henna stains better, mixes smoothly, and produces a darker, longer-lasting color. This is especially helpful for learners trying to master their first designs. Many people also learn how to judge powder quality and prepare perfect mixes through a structured Henna Course, where detailed lessons help avoid beginner mistakes. With high-quality powder, the rest of your supplies become easier to manage and your results become more consistent.
Essential Liquid Ingredients for Mixing Henna Paste
Henna powder alone cannot create designs—you need the right liquid ingredients to turn it into smooth, workable paste. The most common liquids include lemon juice, water, and tea. Lemon juice helps release the dye, giving you a deep and rich stain. Water works well too, especially for sensitive skin. Some artists prefer brewed tea because it adds extra tannins that enhance the color. You will also need essential oils like lavender, eucalyptus, or tea tree, which help darken the stain and give the paste a pleasant smell. These oils, known as terpenes, make the henna smoother and easier to apply. Choosing liquids carefully matters because they affect the texture, drying time, and final color. Many beginners find that mixing paste is the hardest part, but following expert guidance—often available in a Henna Course Online—can make the process simple and predictable. Having the right liquid ingredients ensures your paste behaves exactly the way you need it to.
Tools for Mixing and Storing Your Henna Paste
Once you have your henna powder and liquids, you need proper tools to mix and store your paste. A mixing bowl made of glass or stainless steel is ideal because henna can stain plastic. A spoon or spatula helps you blend everything evenly. Plastic wrap or an airtight container is important for storing the paste while it rests during dye release. Some artists use piping bags or freezer bags to portion henna into cones once the paste is ready. Henna paste must rest for several hours—or even overnight—depending on the recipe. Proper storage prevents the paste from drying out or losing its staining power. Beginners often struggle with paste drying before use because they do not store it properly. Learning proper storage techniques ensures that your henna remains smooth, fresh, and easy to handle. In a Henna Course, beginners often get step-by-step instructions on how to mix and store paste for the best results.
Applying Henna: Understanding Cones and Applicators
Henna cones are essential tools for applying designs. A good cone allows for smooth lines, controlled pressure, and clean details. Cones can be homemade or pre-made, depending on your preference. Many beginners prefer pre-made cones because they are easier to manage and provide consistent flow. Homemade cones, however, give you more control over thickness, shape, and size. You can use cellophane, parchment sheets, or even specialty henna cone materials to create your own. Applicator bottles are another option, though they are less flexible than cones. The opening of the cone, often referred to as the tip, determines line thickness. A small tip creates delicate, fine lines, which are ideal for intricate henna patterns. Practicing line control takes time, but using the right applicator makes learning easier. Beginners often receive detailed cone-rolling tutorials in a Henna Course Online, which helps them avoid leakage, clogging, and uneven lines.
Preparing the Skin for Henna Application
Skin preparation is often overlooked, yet it plays a major role in how well the henna stain develops. Before applying henna, the skin must be clean, dry, and free from oils or lotions. Washing with mild soap and water helps remove dirt and sweat, allowing the henna to adhere better. Some artists wipe the skin with rubbing alcohol to ensure complete dryness. Exfoliating lightly can also help remove dead skin, resulting in a more even stain. For clients or friends, explaining skin preparation steps helps set expectations and improves results. Proper skin preparation ensures that your beginner designs turn out clear, vibrant, and long-lasting. Many people who study henna professionally through a Henna Course learn how crucial this step is. Once the skin is ready, the henna will glide smoothly and stain more deeply.
Practice Tools for Improving Henna Skills
Every beginner needs practice tools to improve their line control, symmetry, and creativity. Practice sheets—either printed or drawn by hand—help beginners get used to repeating dots, lines, spirals, and leaves. Transparent sheets can be placed over practice designs so you can trace them repeatedly. Acrylic practice hands or silicone sheets also simulate real skin and provide a reusable surface for experiments. Using practice tools builds confidence and prepares you for applying henna on real hands safely. Regular practice leads to smoother lines and better design flow, especially when paired with professional guidance from a Henna Course Online, where structured exercises help build skills efficiently.
Aftercare Supplies for Long-Lasting Stains
Aftercare plays a huge role in the final color of your henna stain. Even perfect designs can fade quickly if aftercare is ignored. Essential aftercare supplies include lemon-sugar sealant, breathable wrapping materials, and natural oils like coconut or olive oil. The lemon-sugar mixture is lightly dabbed onto dried henna to keep it in place and prevent cracking. Wrapping the area with tissue or medical tape keeps the paste warm and secure. Once the paste is removed, applying natural oils helps protect the stain from water and soap during the first 24 hours. Proper aftercare supplies help beginners achieve deep, long-lasting stains that make their designs stand out. A good Henna Course teaches aftercare techniques in detail so beginners can consistently produce strong, dark results.
Final Thoughts
Starting your henna journey becomes much easier when you gather the right supplies and understand how each one supports your learning. From choosing high-quality henna powder to using proper cones, practice tools, and aftercare products, each supply plays an important role in your progress. Whether you are exploring henna for fun, artistic expression, or future professional work, having proper guidance can accelerate your growth. Many learners choose to join a Henna Course Online to gain structured lessons, expert tips, and support as they improve. With the right tools and consistent practice, even beginner henna artists can create stunning designs that showcase creativity and skill.